You are browsing from: 
United States
Change Location:
You are browsing in:
£ Pound Sterling (GBP)
Change Currency:
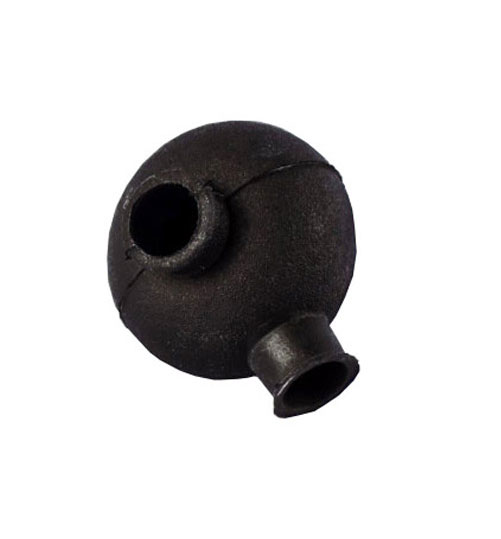
Rubber Dust Protection Sealing Boot for Studded Rod Ends 1/2", 5/8" & 3/4"
Protect your investment in high quality rose joints and seal them from the elements with these totally unique, patented, Rose Joint stretch protective one piece moulded sealing Boots.
In almost all cases, these unique , fully enclosed protective one piece moulded Neoprene Rubber stretch boots may best satisfy the needs of any application where complete rose joint protection from ingress of water ,dirt, road salt , mud or other abrasive elements is desired....especially critical for Autograss and Shale circuit racers ,off road vehicles ,kit cars or rally cars !!
Full fitting instructions can be found below
This sale is for one piece of the studded Rose Joint boot size, but these are also available for other popular Metric Rose Joints and Imperial (UNF) Rose Joints
Our range covers the following sizes ;-
Metric range sizes available :-M6 ,M8 ,M10,M12,M14,M16,M18
Imperial Range sizes available: 3/16",1/4" ,5/16",3/8",7/16" ,1/2",5/8",3/4"
The same boot fits Male or Female rose joints.
Exclusive Features
- Suitable for most popular UNF and Metric Rose Joints -Male and Female.
- Provides vastly superior, total and complete protection for all critical parts of the rose joints when compared to having to use flimsy rubber sleeves above and below the rose joint.
- Results in longer life for rose joints.
- Boots can hold and contain rose joint lubricant grease.
- Remove with care and they are completely Re-useable !
- One piece, moulded constructions leaves no seams or other entry points for nasty contaminants.
- Most popular Metric and Imperial sizes available.
Perfect for all general forms of Motorsports
Initial Preparation:
The natural elasticity of the boots allows stretching during assembly.
Lubrication of the boots is required to perform this operation. There are rubber "lubricants" available, but WD40 or dishwashing liquid are also acceptable.
Moderation of the lubricant is critical. Too much creates a mess
and makes the parts hard to handle. Start with a small amount.
Once the boot is installed, be sure to wipe or blow the lubricant off
the boot to avoid eventual breakdown of the rubber compound.
Assembly Procedure:
When looking at a boot, there are three holes: two for the bolt to pass through,
and one that the threaded "shank" of the rose joint will protrude through after installation.
The rose joint should be inserted “shank” first through one of the through rose joint bolt holes,
and then the shank should be fed through the side hole (where the rose joint threaded part is desired to protrude from the boo so the rose joint is in a "diagonal" orientation through the top and side holes.
Then, the rest of the "head" of the rose joint can be inserted and pulled into the boot.
A small, blunt (to avoid puncturing the boot), round dowel can help this process if used like a tyre iron to lever the boot over the body gradually.
The reason for inserting the rose end through the top or bottom bolt holes is because the neck of the rose joint boot is these areas are more expandable than the side hole.
Electricians Neoprene sleeve stretching pliers can greatly ease the installation
The cautionary note here is that this is not an exact science, and some dexterity and determination is a prerequisite. The upside to the exercise is that once the boots are installed, the benefits are obvious.
If you are looking to invest in much higher specification / higher performance Rose Joints and wish to avoid easy bending, breaking of rose joints, balls becoming loose in their sockets after a few months,backlash (and clunking noises) from rear axle bars that are stressing transmission components,Teflon liners pounding out and the cost or repeated replacements of commercial grade rose joints, then we have these items also - check out our other items including Spherical Bearing and Clevis Joints .
Related Products
You may also be interested in...
2025 © McGill Motorsport Ltd | Company No. 374439 | VAT No: 989 5977 13


